![]()
The information contained here is specific to XK Engines converted from automatic transmission and fitted with a Getrag 5 speed gearbox but may be useful for other configurations. This modification is best done before the engine and gearbox is fitted to the vehicle but can be done in situ if necessary.
If your engine already has a manual gearbox and a mechanical speedometer then transferring it from the donor vehicle to the Nostalgia Classic shouldn't require any modification. However if any part of the drive train is altered or replaced such as different diff ratio or tyre size or or gearbox then at least re-calibration of the speedometer will be necessary. Recalibration will need to be done by a specialist such as Speedy Cables, who will require information regarding the Number of revolutions of the tyres per mile and the number of revolutions of speedo cable per mile. The procedure for obtaining this information is set out below.
Getrag gearboxes from an XJS come in at least two different flavours, equipped either for an electric or mechanical speedometer. The good news is if the donor vehicle had a mechanical speedometer the Getrag gear box has all the internal parts required whichever version you have. In the electric speedometer version it is just blanked off. Conversion to a mechanical drive is simple, the following parts are required and can be obtained from SNG Barratt.
| Qty | Part # | Description |
| 1 | EAC5681 | Gear Driven XJS 3.6 |
| 1 | C9177 | "O" ring E S1 / 2 / V12 / / XJ6 / XJS |
| 1 | C32952J | Oil Seal Speedo Drive E Type |
| 1 | EAC5358 | Pinion Housing XJS 3.6 |
| 1 | GCD115 | Speedo Cable Getrag Jaguar 57" |
| 1 | C46183 | Angle Drive XJ40 |

Press the oil seal in to the threaded end of the pinion housing us a little gearbox oil to assist in the process.. You may need to use a hydraulic press or the jaws of a vice and suitable size socket to press the seal home.
Fit the "O" ring to the groove in the body of the Pinion Housing. Apply a little gearbox oil to the "O" ring as required.
Fit the shaft of driven gear in to the Pinion Housing so that the square drive socket can be seen just protruding from the oil seal and the gear wheel is next to the tapered end of the housing.
Fit the assembly to the gear box. The gear wheel should automatically locate and engage internal drive in the gearbox. Secure the pinion housing using the keep plate and bolt retained earlier.
Screw the angle drive on to the end of the pinion housing. (Note When the gearbox is fitted to the car it may be necessary to cut a notch out of the supporting cross member of the chassis to accommodate the gearbox and prop shaft alignment)
At the speedometer installation stage
Screw the speedo drive cable to the angle drive. Route the drive cable to
the vicinity of the Speedometer instrument making sure any bends in
the drive cable are as gentle as possible to minimise friction.
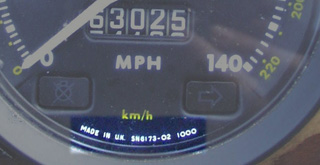
Location of speedo calibration data (above)
Speedometer Calibration:
Whomever calibrates the instrument will need to know the number of turns
of the speedo cable per mile The speedometer taken from the XJ6 will
most likely be calibrated to 1000 revs / mile. You can find the number
written on the dial of the instrument. the change from auto to manual or any
other changes in the drive train such as tyre / wheel size or diff ratio
will affect the calibration. Since the accuracy of the speedo is
checked at SVA it is imperative to have the speedo recalibrated by a
specialist such as
Speedy Cables.
You will need some assistance to carry out this procedure.
In order to calculate the correct figure for your
installation you will need to do the following. Fit the wheels and lower the
car to the ground if not already done.. (You can not carry out this
procedure accurately by jacking the car up and turning the rear wheels
by hand) Make sure the tyres are inflated to the correct pressure (23 psi).
Note: Since road distances are in miles work in Imperial measure, Feet &
Inches for all measurements. Obtain the radius of a rear wheel (R) by
measuring from the centre of one of the rear wheels, vertically down to the
ground. The tyre radius can be used as an accuracy check calculation for the
circumference of the tyre by using the formula circumference of the
tyre (C) = 2π(R) where π = 3.142
Mark the wall of the tyre with tape or chalk, at the point
where the measurement was taken. Transfer and make a corresponding mark on
the ground such that the mark on the tyre and that on the ground line up, to
denote the start point (S). (see right).
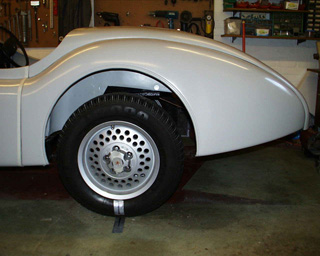
Tyre marked and ground marked to determine the start point (above)
Move the car forward exactly 5 revolutions of the tyre and mark the ground in line with the mark on the tyre (the finish point (F)). Measure the distance between the two marks. The tyre circumference (C) can be calculated by dividing the distance between the start and finish points on the ground by 5. Circumference (C) = (F-S)/5. Express the answer in feet. The number of Revolutions of the tyre per mile (T) Can be calculated by dividing 1 mile (5280 ft) by the circumference of the tyre. 1 mile = 5280ft . The number of revolutions of the tyre (T) = 5280/(C)
We need to know the corresponding number of turns of the prop shaft (P) The standard diff ratio of an XJ6 (D) is 3.31:1. If you have a different one, such as a limited slip diff (LSD) consult the donor vehicle manual or look for an identity tag on the diff which may contain the required information. The turns of the prop shaft (P) is simply the revolutions of the tyre per mile (T) multiplied by the Diff ratio (D). For a Standard diff P = T x 3.31
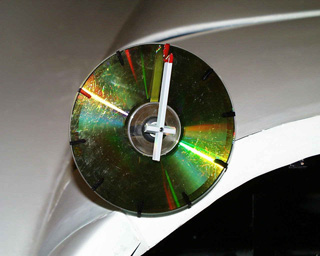
Speedo cable revolution counter
Lastly in order to calibrate the speedo we need to know the speedometer drive ratio. I found the best way to do this was to fit the speedo cable to the gearbox. Use an old CD and divide it's circumference in to 10 equal parts. Mark each part on the CD surface with a felt pen (to form a decimal clock) fit a rubber grommet to the hole on the centre of the CD and fit it over the end of the speedo cable. Make a small pointer from paper or plastic and fit this to the square drive of the end of the cable inner. Align the pointer with the zero mark the CD dial. (see left) Make a mark on the gearbox and a corresponding mark on the prop shaft, Move the car forward exactly 10 turns of the prop shaft at the same time note how many turns the speedo drive cable makes by reading off the value on the CD dial. In my case 10 turns of the prop shaft was 3.7 turns of the speedo cable Drive Ratio (DR) = 3.7 divided by 10 = 0.37
The number of turns of the speedo cable per mile (SC) = the turns of the prop shaft (P) multiplied by the drive ratio (DR), (SC) = (P) x (DR)
In the interest of accuracy you may want to carry out this procedure more than once and take an average of the readings obtained
|
Description |
|
|
|
|
|
|
Calculation / Observation 1 |
Result 1 |
Calculation / Observation 2 |
Result 2 |
|
Wheel Size |
15 x 6J |
15 x 6J |
||
|
Tyre size |
205 x 70 R15 |
205 x 70 R15 |
||
|
Tyre condition & Pressure |
New / 23psi |
|
New / 23psi |
|
|
Rear Nearside Wheel Centre |
|
12.4" |
12.4” |
|
|
5 Rotations of Wheel |
33’4½” (33.375 ft) |
400.5”
|
33’4½” |
400.5” |
|
Tyre Circumference |
400.5 ÷ 5 |
80.1” |
400.5 ÷ 5 |
80.1” |
|
Tyre revolutions per mile |
5280 / 33.375 x 5 |
791 |
5280 x 12 ÷ 80.1 |
791 |
|
Differential Ratio: |
3.31:1 |
|
3.31:1 |
|
|
Prop Shaft Revolutions per mile: |
791 x 3.31 |
2618 |
791 x 3.31 |
2618 |
|
Speedometer Drive Ratio |
3.7 ÷ 10 |
0.37 |
7.36 ÷ 20 |
0.368 |
|
Speedometer Turns / Mile |
2618 x 0.37 |
968 |
2618 x 0.368 |
963 |